User Management
Tip: Press the Ctrl-F keys to search this topic.
Users are employees who handle the logistics at an Agency. A User is assigned a Role, such as Admin, Coordinator, or Collection Representative. Permissions in the system are role-based; therefore, permissions are enabled for a role (rather than for an individual User). Functions, features, and modules are dictated by system permissions to include functionality within the Admin tab.
Permissions are granted and modified for Roles via the User Management function under the Admin tab. Use the User Management function to create a New User, generate a User Search, and Edit Roles.
New User
Users with roles that are assigned the Edit Roles permission are granted the permission to add New Users and deactivate User Accounts in the system. The New User and Inactivate Users permissions must be enabled by an Agency Admin for a selected role to access respective functionality. This section provides instructions on how to assign permissions to a role, create new users in the system, and deactivate user accounts.
Assigning Permissions to a Role
|
Step |
Action |
|---|---|
|
1 |
Navigate to Admin > User Management > Edit Roles. |
|
2 |
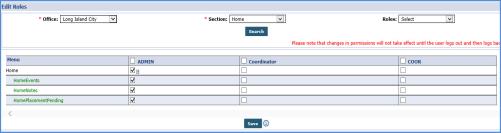
Select the system section from the Section field dropdown (required) and role from the Roles field dropdown (optional). |
|
3 |
Select the New User and Inactivate Users under the User Management section (as illustrated in the image).
Permissions |
|
4 |
Click Save (at the bottom of the page) to apply the changes. |

Creating a New User
|
Step |
Action |
||||||||||||
|---|---|---|---|---|---|---|---|---|---|---|---|---|---|
|
1 |
Navigate to Admin > User Management > New User to access the Add New User page. |
||||||||||||
|
2 |
The Add New User page opens. Complete the required fields (denoted with a red asterisk), as illustrated in the image below and described in the table underneath.
Add New User Page
|
||||||||||||
|
3 |
On this page, User Access location, days, and times can be restricted using the IP Address fields. Select one or both options as illustrated in the image to the right and described in the table below.
Note: These restrictions are optional.
Access Restriction
|
||||||||||||
|
4 |
Select other permissions specific to the user such as Pending Placement Notifications, Reporting Tool access, and Accept Unspecified Office Placements. |
||||||||||||
|
5 |
Additional settings can be indicated for the user under the Office Setup section. Click the Add button to assign other Offices and functionality (per Office) to the user. For example, the image below illustrates that this user is the Coordinator in the Hope & Care Providers Office, able to view all Open Cases for the selected Coordinator. This user can also Override OT Limits for that Office.
Only one Office can be the designated Primary at a time. Once a Primary Office is selected, functionality in other Offices is limited.
New User: Office Setup |
||||||||||||
|
6 |
Click the Save button to create the New User’s profile. Thereafter, the user receives an email with a temporary password to log in to the system. |
||||||||||||
|
7 |
Provide the user his/her login name. The email does not include this information. |


Create Password for a New User
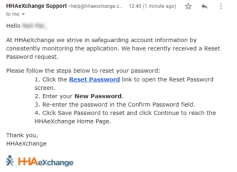
When an Agency Admin creates a New User Account, a Create Password process is generated by the system once the new profile is saved. The following examples demonstrate the steps for users to Create a Password. The User receives the Create Password email with link and instructions. Upon clicking on the Create Password link, the user is routed to the Login screen, seen below.

The image on top illustrates a standard Create Password Login page. The image following that illustrates the Login page for Agencies configured to require Terms and Conditions.
On this screen, the user:
-
enters a Password;
-
re-enters the password in the Confirm Password field; and
-
Clicks on Save Password to continue.

Create Password: Standard Login Page
On this screen, the user:
-
enters a Password;
-
re-enters the password in the Confirm Password field;
-
selects the required Accept Terms and Conditions checkbox; and
-
click on Save Password to continue.

Create Password: With Terms and Conditions
The system guides the user with instructions and password requirements. Refer to the Self-Service Password Reset Job Aid for further guidance.
Password Reset Initiated by Administrator
Agency Admins can initiate a Password Reset for any Agency user for various purposes, typically for security measures (for example, if credentials are compromised). Instead of providing a password for the user, the process is automated prompting the user to reset the password after the initiation from the Agency Admin.
Initiating the Password Reset
A Password Reset can be initiated via the User Account page (Admin > User Management > User Search). On the Update User Account page, click on the Reset Password link (as seen in the image below).

User Account Page: Reset Password Link
The system alerts the Agency Admin that an email has been sent to the user with a Reset Password link, effective for the next 12 hours.
Click out of the alert to close the window and return to the User Account page. No further action required from the Agency Admin.

Password Reset Alert
User Password Reset
The Agency user receives an email with the link and instructions to reset their password. The User follows the prompts to reset their password accordingly. Refer to the Self-Service Password Reset Job Aid for further guidance and password requirements.
Deactivate User Account
Only roles with the Inactivate Users permission can deactivate a user; otherwise the Status field is unavailable to edit.
|
Step |
Action |
|---|---|
|
1 |
Navigate to Admin > User Management > Search User. |
|
2 |
Click on the Edit link to access the Update User Account page. |
|
3 |
From the Status field select Inactive.
User Status |
| 4 |
Click Save. Once saved, the user cannot access the system with given credentials. |

User Search
To search for a User in the system, either enter the User’s First Name, Last Name, Login Name, Email address, Role, or Status to narrow a search or simply click on the Search button to view all Users.
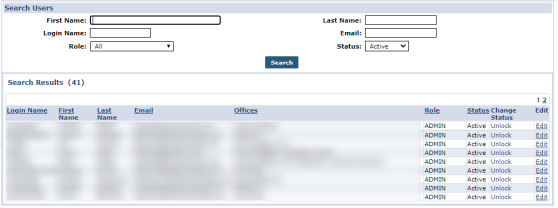
User Search
The Search Results include the following information per line item:
|
Column |
Description |
|
Login Name |
User's HHAX login name. |
|
First Name |
User's first name |
|
Last Name |
User's last name |
|
|
The email address associated with the user in the HHAX system. |
|
Offices |
All associated Offices the User is assigned to. |
| Role |
Role(s) assigned to the User |
| Status | User Account Status (Active or Inactive) |
| Change Status |
Link allowing an Admin to unlock a User’s Account |
|
Edit |
Link allowing an Admin to Edit a User’s Profile |
Update User Account
On the Search Results, click on the Edit link for the applicable User to open the Update User Account page, as illustrated in the image below.
This page contains the user’s information as entered when the profile was created, refer to the Creating New User section for field descriptions. From here, make the necessary edits, to include changing the Status, resetting the Password, applying restrictions, or editing Office Setup. Click Save to apply.

Update User Account
Edit Roles
The Edit Roles function allows Agencies to edit the permissions of any Role created for the Agency by HHAX. Complete the steps below to edit permissions for a Role.
|
Step |
Action |
|---|---|
|
1 |
Navigate to Admin > User Management > Edit Roles. |
|
2 |
Select the applicable and required Office and Section fields. The Role(s) field is optional. If a specific Role is not selected, then the system displays all Roles for the Agency (to compare permissions).
Edit Roles Page |
|
3 |
Select/deselect Permissions (left-most column) according to role. |
|
4 |
Click Save. |
Note: Roles can only be created by HHAX.
Track and Prevent Duplicate SSN for System Users
| DISCLAIMER |
|
This feature is enabled by HHAX System Administration. Please contact HHAX Support Team for details, setup, and guidance. |
In the User Account page (User Management > New User or > Update User Account) Agencies can use the SSN field to capture a system user’s Social Security Number (SSN), as seen in the image below. This feature is used to track and validate a system user’s SSN ensuring that duplication is detected across the platform for Active and Inactive users. This functionality works similar to how a Caregiver SSN is tracked and validated in the system.
While not a requirement for most agencies, some markets are required to capture and track a system user’s SSN to detect duplication and fraud. If requirement is enabled, then the SSN# field appears with a red asterisk; otherwise the field appears as optional. To view the history of the SSN for the user, click the H link to the right of the SSN# field. The history is only applicable if the SSN# field is required.

User Profile: SSN# Field
Note: If enabled, this functionality also applies to User Profiles imported into the system.
If a duplicate SSN is entered in the system, then the system issues a validation message not allowing the profile to be saved (as seen in the image below).

Validation: Duplicate SSN on File
Prevent Duplicate User Email
| DISCLAIMER |
|
This feature is enabled by HHAX System Administration. Please contact HHAX Support Team for details, setup, and guidance. |
Providers can prevent duplication of email addresses in the system. Once enabled, the system validates for user email addresses to be unique across the entire platform when creating or editing a User Account (Admin > User Management > Update User Account). This applies to both Active and Inactive email addresses.
When a User attempts to create or edit a User Account using a current or former email address (Active or Inactive), the system issues a validation not allowing the duplicate email address to be saved.
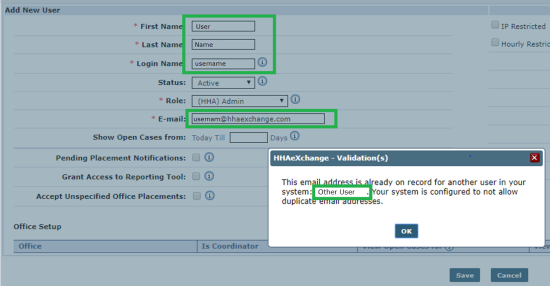
Validation: Duplicate Email Address Detected
Note: If enabled, this functionality also applies to User Profiles imported into the system.