Creating Visits
Tip: Press the Ctrl-F keys to search this topic.
This section provides a high-level instruction on how to schedule visits using the Patient Calendar, as well as scheduling using the Master Week function.
Non-Skilled Visits
Non-clinical visits in the system are classified as Non-Skilled, meaning only non-skilled disciplines can be assigned to them. Follow the steps below to create a non-skilled visit.
|
Step |
Action |
|---|---|
|
1 |
Navigate to the desired Patient and click the Calendar page on the Index. |
|
2 |
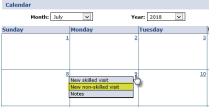
Click on the date number (hyperlink) at the top-right of the Calendar cell and select “New non-skilled visit” from the options.
Creating a Non-Skilled Visit |
|
3 |
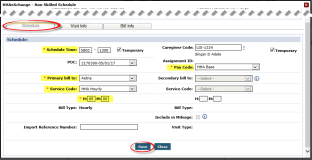
The Non-Skilled Schedule window opens on the visit Schedule tab. Complete the required fields (denoted with a red asterisk).
Note: If a Caregiver is marked as Absent, has a Restriction for the select Contract, or is scheduled for an In Service on the date of the visit, the system issues a warning either requesting confirmation or stating that the selected Caregiver cannot be scheduled.
Schedule Visit tab – Scheduling a Non-Skilled Visit Note: The Visit Info and Bill Info tabs are used to review visit information after the visit has been completed and billed. |
|
4 |
Click the Save button to schedule. |
|
5 |
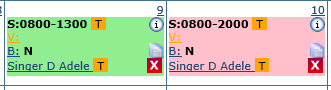
Once saved, the system automatically performs a series of validation and authorization checks to ensure any Agency rules or contractual obligations are not breached. If a validation error is detected, then the system warns or restricts one from saving the visit.
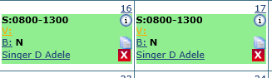
Visits displayed in green are within Authorization parameters, while those in pink indicate an Authorization issue, as illustrated in the image.
Scheduled Visits Note: The system only reviews visits in a 14-day block based on the current date. Visits outside of this range display in white. |
Visits scheduled with a Service Code that is not covered by the Authorization, or setup to bypass Prebilling validations also display in white, even if within the 14-day block. Consult with an Administrator to discuss which Service Codes the Agency has authorized to skip Prebilling validations.
Skilled Visits
Skilled visits (Clinical) are those involving medical services and only skilled disciplines (such as Nurses or Physical Therapists) can be assigned to them. Follow the steps below to create a Skilled visit.
|
Step |
Action |
|---|---|
|
1 |
Navigate to the desired Patient and click the Calendar page on the Index. |
|
2 |
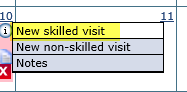
Click on the date number (hyperlink) at the top-right of the Calendar cell and select “New skilled visit” from the options.
Creating a Skilled Visit |
|
3 |
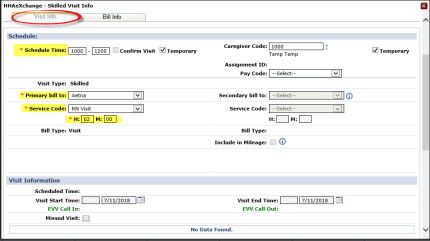
The Skilled Schedule window opens on the Visit Schedule tab. Complete the required fields (denoted with a red asterisk).
Schedule Visit tab – Scheduling a Skilled Visit |
|
4 |
Click the Save button to schedule. |
|
Step |
Action |
|---|---|
|
5 |
Once saved, the system automatically performs a series of validation and authorization checks to ensure any Agency rules or contractual obligations are not breached. If a validation error is detected, then the system warns or restricts one from saving the visit.
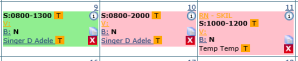
Visits displayed in green are within Authorization parameters, while those in pink indicate an Authorization issue, as illustrated in the image.
Scheduled Visits Note: The system only reviews visits in a 14-day block based on the current date. visits outside of this range display in white. |
Patient Calendar – Unauthorized Visit Reasons
The Patient Calendar includes reasons for Unauthorized visits (displayed in pink). Hovering over the red “thumbs down” icon displays a pop-up message indicating the reason the visit is not Authorized, as seen in the following image.
")
Unauthorized Visit Reason (Pink)
Note: A visit may have multiple un-authorization reasons. Hovering over the icon shows a single reason at a time. If corrected, then the second reason displays.
The following table provides a list of Scenarios, the associated Unauthorized Visit Reason and a description for each.
|
Scenario |
Unauthorized Visit Reason |
Description |
|---|---|---|
|
Exceeds Guardrail Limit |
Insufficient Authorization - Guardrails |
Visit does not have sufficient authorization because of a monthly Guardrail limit |
|
Additional Rules |
Additional Rules – Failed Validation |
Visit fails Additional Rules validation |
|
Service Code |
Authorization not available with this Service Code |
Missing Service Code or the Service Code is not valid for the Authorization Type |
|
No Authorization |
Authorization Not Available |
No Authorization available for the visit |
|
Visit Out of Authorized Date Range |
Authorization Not Available |
Visit falls outside of Visit Start or End Date |
|
Visit less than 15 Minutes |
Visit less than 15 Minutes |
Visit is less than 15 minutes |
|
Blackout Date |
Blackout Date |
Visit on a blackout date |
|
Daily Period Type Authorization with Time Restrictions |
Insufficient Authorization |
Visit scheduled outside of Daily Period Type Time Restrictions |
|
Manual Authorization |
Manual Authorization |
Manual intervention required due to a manual Authorization |
|
Missed Visit – Travel Time |
Insufficient Authorization |
Missed Visit Travel Time approval |
|
Weekly, Monthly Authorization (Type 1) |
Insufficient Authorization |
Visit exceeds the allowed Max Units per Period |
|
Billing Adjustment to use Authorization Units |
Insufficient Authorization |
Billing adjustment causes the visit to not have sufficient Authorization |
|
Daily, Weekly, Monthly Authorization (Type 2) |
Insufficient Authorization |
Visit exceeds the allowed Max Units for the Entire Authorization |
|
Primary/Secondary Contract |
Insufficient Authorization |
Primary and Secondary Contract together do not have sufficient Authorization for a visit |
|
Weekday (Specific Date Type) |
Visit cannot be scheduled to start on a Weekend |
Visit is authorized for a specific date type (weekday) but the visit is scheduled on the weekend or holiday |
|
Weekend (Specific Date Type) |
Visit cannot be scheduled to start on a Weekday (unless a Holiday) |
Visit is authorized for a specific date type (weekend/holiday) but the visit is scheduled on a weekday |
Visit Authorization Allocation
Agencies may review and edit Authorizations automatically applied to Scheduled visits on the visit Bill Info tab.
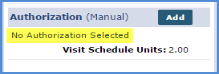
Authorization on Bill Info Tab
The Authorization section of the Bill Info tab contains the following fields / functionality:
|
Field / Functionality |
Description |
|---|---|
|
Authorization Number |
The Authorization currently assigned to the visit. This field also contains all the Authorizations associated with the Patient applicable to the visit. For example, if the Scheduled visit is for Non-Skilled service, only Authorizations for Non-Skilled service are available. |
|
Units |
Allows one to set the number of Units from the Authorization applied to the visit.
|
|
Add (button) |
Allows one to apply additional Authorizations to the visit.
Apply Additional Authorization |
The Authorization functionality is available for both Primary and Secondary Contracts, allowing Agencies to split Authorization hours between the two:
Set Primary / Secondary Authorizations
The Authorization section of the Bill Info tab has several “statuses” depending on how the Authorization is applied to the visit, as well the Contract’s scheduling requirements, as follows:
|
Status |
Description |
|---|---|
|
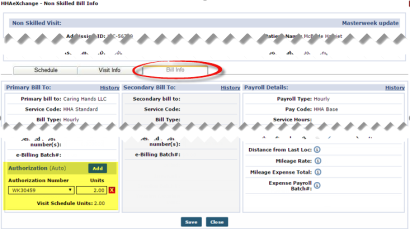
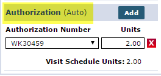
Authorization (Auto) |
This status indicates that the system assigned the Authorization(s) to the visit.
Authorization (Auto) Status |
|
Status |
Description |
|---|---|
|
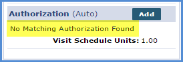
No Matching Authorization Found |
This status indicates that the system was unable to assign an Authorization that matches the visit details (e.g., no Authorization for selected Caregiver skill type).
No Matching Authorization Found |
|
Authorization Not Required |
This status indicates that the selected Contract does not require an Authorization to schedule visits.
Authorization Not Required |
|
No Authorization Selected |
This status indicates that that an existing Authorization has been deleted and a new one was not assigned.
No Authorization Selected |
Validations and Scheduling Scenarios
This section covers scheduling scenarios and validations caused by the addition of the Visit Authorization Allocation function.
Over/Under Applying Authorization Units
Over or under applying Authorization Units to a visit results in a validation error. For example, if a single Authorization Unit is applied a to a visit scheduled for 2 hours, one is only authorizing a single hour of the visit. In the other hand, applying 3 Authorization Units to a 2-hour visit authorizes an hour of non-scheduled service.
The system does not allow for either scenario. If over or under Authorization Units are applied, the following validation messages display:
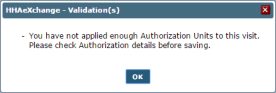
Under Applying Units Validation Error
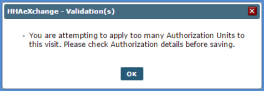
Over Applying Units Validation Error
Apply Zero Authorization Units
Users may choose to apply 0 Authorizations Units to a visit without triggering a validation error. Instead, the visit displays in pink, indicating that it is unauthorized and will be held on the Prebilling Review page. The system requests confirmation before saving a visit with 0 Authorization Units.
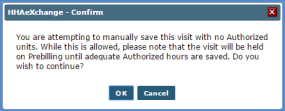
Confirm Zero Authorization Unit Entry
“Manual” / “Automatic” State Visit Logic
Authorizations applied to Visits may exist in two states: Automatic and Manual.
An Automatic state refers to a visit Authorization unedited or removed by a user. The Authorization/Units are automatically applied to the visit by the system at the time of scheduling. When a visit Authorization is in this state, the system automatically updates the Authorization information with respect to changes to the visit schedule.
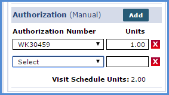
A Manual state is when a user manually edits, removes, or adds Authorization information (for either the Primary or Secondary Contract) to a visit. In this case, the system does not automatically adjust the Authorization to fit changes to the visit schedule. More specifically, if the visit schedule duration is extended or the Service Code is changed, the system automatically reduces the Authorization Units to 0. The visit subsequently turns pink on the Patient Calendar signifying that there is an Authorization issue.
The system reduces the number of applied Units in a “Manual” state if a visit is rescheduled with a shorter duration.
This logic also applies when the Authorization is edited on the Patient Authorization page. The system reassesses visits in an “Automatic” state to ensure they are still compliant, whereas visits in a “Manual” state are automatically reduced to 0 Units.
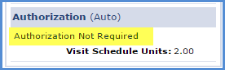
Bypass Pre-Billing / Authorization Not Required Logic
If the Service Code selected for the Primary Contract is set to bypass Prebilling validation, or the Primary Contract does not require an Authorization, the visit Authorization section for both the Primary and Secondary Contract is set to “Authorization Not Required” (as illustrated in the following image).
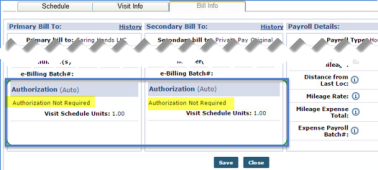
Authorization Not Required
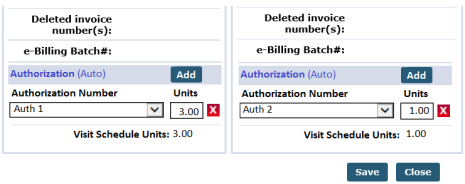
Invoice Logic
When invoicing a visit with more than one Authorization applied to the Primary Contract and/or Secondary Contract, the system applies the first Authorization for each to the invoice. For example, in the following image, Auth 1 for Primary Contract and Auth 3 for the Secondary Contract would be applied to the invoice for this visit.
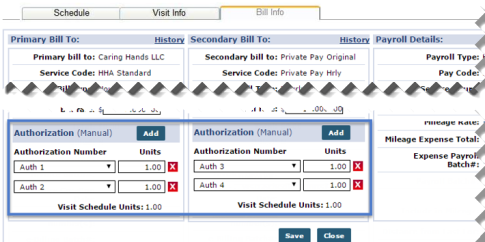
Auth 1 and Auth3 Appled to Invoice
Authorization Deletion Logic
Any visits associated with an Authorization that have been billed or exported cannot be deleted. If a user attempts to delete an authorization where visits have been billed or exported, the system displays the following message: “This Authorization has already been applied to billed visits and cannot be deleted.”
Copy and Create Tool
With the Copy and Create tool apply new visits to the Calendar in either of the following ways:
-
Select Copy to duplicate visit information to a ‘clipboard’. Once copied, apply the visit information to other dates.
-
Select Copy and Create to copy the visit information and open a new window to apply the information to other dates and also edit the visit information.
The following tables provide step-by-step instructions on how to use the Copy and Create tool.
Copy a Visit
|
Step |
Action |
|---|---|
|
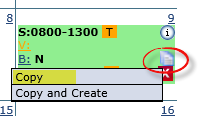
1 |
From the Patient’s Calendar page, click the Copy and Create icon on the right side of the Calendar day cell (as illustrated in the image). Click Copy. The system informs that the visit details have been copied to the clipboard.
Copy Visit |
|
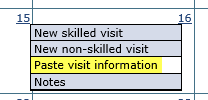
2 |
Once copied, click on the date number (hyperlink) in the desired Calendar day cell. Select Paste visit information from the options.
Paste Visit Information |
|
Step |
Action |
|---|---|
|
3 |
Upon selecting, the visit details from the first shift are copied to the selected date. The visit details may be applied to multiple dates, as desired.
Copied Visits Note: Even if a copied visit is authorized, pasting the visit information on a day that is not covered by the Authorization results in an Unauthorized visit (displays in pink). |
Copy and Create Multiple Visits
|
Step |
Action |
|---|---|
|
1 |
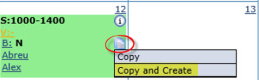
From the Patient’s Calendar page, click the Copy and Create icon on the right side of the Calendar day cell (as illustrated in the image). Click Copy and Create. The system informs that the visit details have been copied to the clipboard.
Copy and Create Visit |
|
2 |
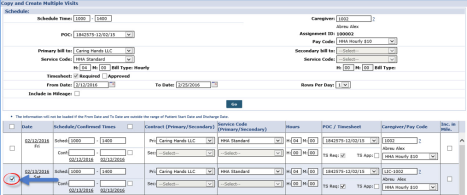
The Copy and Create Multiple Visits page opens. Select the checkboxes in the right column to copy the visit information to multiple days. Visit information may also be edited for each day it is applied to.
Copy and Create Multiple Visits |
|
3 |
Once the visit information has been applied to the selected days, scroll down and click the Save button. Refresh the webpage to see the updated Calendar. |
Setting a Master Week Schedule
If a Patient receives the same service on a regular basis, the Master Week function is used to generate a permanent schedule. Once set, the system uses the information in the Master Week to update the Patient’s Calendar every night for 14 days into the future in a process known as “roll over.” Any changes to the Master Week are reflected in future visit when it “rolls over” again.
Note that if a Master Week schedule results in a Caregiver surpassing the Agencies set overtime threshold, the Master Week only needs to be validated once. The system does not inform/require users to validate the Caregiver’s overtime in the future. Refer to the Overtime Validation section of this document for further information.