Authorization
Providers cannot edit Authorization details for UPR Linked Contracts. Editing has been disabled for these contracts to protect Providers from changing values that may potentially cause claims rejections. If the Payer changes any details on their HHAX system, then the edit automatically reflects on the Provider’s platform.
For UPR Linked Contracts, the Patient Authorization information is controlled by the Payer and most fields are locked including the Billing Diagnosis Code fields; the Diagnosis Code table is not seen for these Authorizations.
The Diagnosis Codes for an Authorization coming from the Payer are represented as read-only Billing Diagnosis Code fields on the Provider platform.
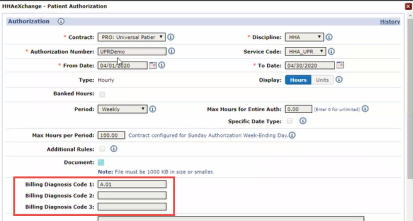
Provider Platform: Patient Authorization
Note: If a Provider has access to the Patient’s Clinical pages (Patient > Clinical), then they can enter and manage other Diagnosis Codes, Surgical Codes, as well as other Clinical information, without affecting the information received on the Authorization from the Payer.
Limiting Entire Period Authorizations (Guardrails) for UPR Contracts
Payers can restrict Entire Period type authorizations to prevent Providers from over utilization (over-servicing the Member). Termed as Guardrails in the system, these controls govern how the authorization can be allocated by Providers, ensuring that units are available throughout the entire period (lasting to the scheduled End Date).
Refer to the Guardrails topic for full details on this feature.
Note: This functionality only applies to Hourly rate types.
Provider-Managed Guardrails for Entire Period Authorizations
Typically, when a Payer sends a Placement, all Authorization fields are locked for UPR Contracts.; however, Providers can set an Authorization Guardrail for Entire Period type Authorizations for UPR Contracts. This preserves the Payer’s mandated overall Authorization limit while allowing a Provider more flexibility to subdivide the Authorization Period (Monthly, Weekly, or Daily) totals and use the Additional Rules functionality.
When an Entire Period type Authorization is sent by the Payer, the Period field becomes available for a Provider to edit on the Patient Authorization window, as seen in the following image.

Patient Authorization: Editable Period Type
If the Provider selects any other Period type, then the value (number of Units) originally indicated in the Max Units per Period field moves to the Max Units for Entire Auth field (and unavailable to edit), as seen in the following image. When the Period type is changed, the Additional Rules checkbox also becomes available to edit.

Max Units Per Period, Max Units for Entire Auth, and Additional Rules
Creating a TEMP Authorization
If a Payer does not send a timely authorization for a Patient, the Provider can create a TEMP Authorization. This enables the Provider to schedule visits and pay their Caregivers until the authorization is received from the Payer. An official Payer Authorization is required for billing; otherwise, the visits are stopped in Billing Review and cannot be billed.
To create a TEMP Authorization, navigate to Patient > Authorizations/Orders and click on the Add button to open the Patient Authorization window. Select the UPR Linked Contract from the Contract dropdown field. The Authorization Number field immediately auto-fills with TEMP (unavailable to edit), as seen on the image to the right.
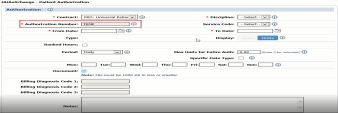
Patient Authorization Created by Provider
Complete required fields (denoted with a red asterisk) and click Save to finalize.
In this case, once the Payer sends the official authorization, then applicable visits can be updated, and billing can take place. The TEMP Authorization can be deleted.
When the placement is sent, accept the placement from the Payer (UPR Linked Contract). Then, merge the placement with the “Temporary” Patient record and manually change the Contract on the Schedule tab to the UPR Linked Contract.
Solutions for TEMP Patient and/or Authorizations
The following are examples and recommended resolutions to handle missing Patient and/or Authorization scenarios.
|
Scenario |
Recommended Steps |
|---|---|
|
Brand New Placement with Authorization |
Review and accept Pending Placement. A Patient Record with access to Internal and UPR Linked Contracts is created with an authorization. |
|
Brand New Placement without Timely Authorization |
When the official Payer Authorization is received, two authorizations now exist for the Patient.
|
|
No Timely Placement or Authorization |
When the official Payer Placement and Authorization are received.
|