Authorizations
Tip: You can press Ctrl-F on your keyboard to search this topic.
This topic describes how to add, edit, and delete Authorizations, which are the terms of service for Placements—including the type, duration, and frequency of service. Proper management of Authorizations is vital in ensuring that Providers correctly schedule and bill for services.
Add an Authorization
To add an Authorization, complete the following steps.
|
Step |
Action |
|---|---|
|
1 |
At the top right of the Authorization page (Member, Search, search for and select a Member, Authorization), click Add Authorization. |
|
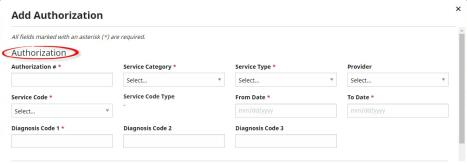
2 |
In the dialog that appears, fill out the following fields under Authorization.
Add Authorization Dialog
Note: Payers can contact the HHAX Support Team to specify that a Provider should enter Billing Diagnosis Codes instead. Codes will then be transferred back to the Payer in the Claim file. Enabling Billing Diagnosis Code entry for a Provider disables it for a Payer. |
|
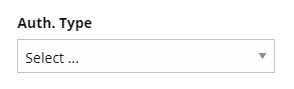
3 |
Select an Authorization Type with which you will specify the number of hours to be allotted Daily, Weekly, Monthly, or for the Entire Period.
Authorization Type Menu Authorization Types include:
Additional authorization rules that apply to Weekly, Monthly, or Entire Period authorizations can be set up by a Payer to limit the authorization use by a Provider. |
| 4 |
(Optional) If desired, attach a file to the authorization with the Upload File button. You can also add Notes (or Internal Notes, which are not visible to the Provider). |
| 5 |
At bottom right, click Add Authorization to finish adding the Authorization. |
Add Additional Authorizations for a Single Placement
To add additional Authorizations for a Placement, on the Member’s Provider Info page (Member, Search, search for and select a Member, Provider Info), click Add another authorization under an existing Authorization, as shown in the following image. In the panel that appears, complete the new Authorization.
You can add up to 52 Authorizations for a single Placement.
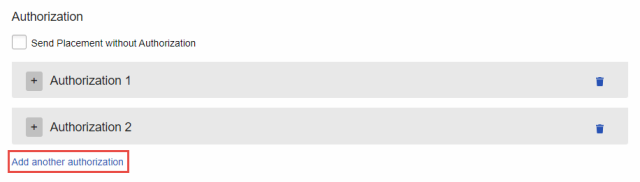
Adding Another Authorization
Edit an Authorization
To edit an Authorization, complete the following steps.
|
Step |
Action |
|---|---|
|
1 |
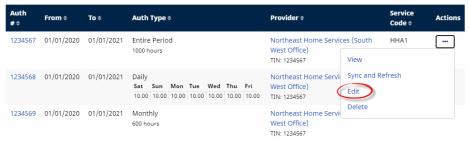
On the Authorization page (Member, Search, search for and select a Member, Authorization), to the right of the Authorization to edit, in the Action column, click the ellipsis (...), and select Edit.
Editing an Authorization |
|
2 |
In the dialog that appears, make changes to the Authorization. Some fields are locked to prevent billing and scheduling issues. You can add, view, and delete Blackout Dates (dates not available for scheduled visits) for any existing authorization. |
|
3 |
At bottom right, click Save to update the Authorization. A note is automatically created and saved to the Member’s Notes page. Note: HHAX strongly advises giving Providers advanced notice if an Authorization update drastically changes a Member’s scheduling requirements. |
Note: To sync and refresh an authorization that has been edited by the Provider, click the three dots to display a menu and select Sync and Refresh. Sync and Refresh updates the authorization within the HHAX system.
Delete an Authorization
To delete an Authorization, in the Action column, click the ellipsis (...) and select Delete. A note is automatically created and saved to the Notes page.
Note: Use the Delete function only when an Authorization is sent with an incorrect Service Type, Service Code, or Authorization Type. If an Authorization must be deleted, remove it as soon as possible. After a Provider uses any part of an Authorization, the Authorization cannot be deleted.