Release Notes 24.03.01
These release notes contain a high-level overview of updates and new functionality introduced to the HHAeXchange Professional software. As HHAeXchange is permission-based, not all functionality is available for every role. Further inquiry concerning the contents of this document should be directed to HHAeXchange Client Support.
Release Notes Summary
To view a history of Release Notes, refer to the Release Notes Summary providing an overview of archived releases.
In This Release...
Below listed are the features included in the 24.03.01 release. Each has a brief explanation of the updates.
Suggested Schedule Times for Variable Schedule Types
Updating Pending Authorizations
Moving Unutilized Authorizations to a New Provider
Dashboard Custom Views and Added Features
Suggested Schedule Times for Variable Schedule Types
A Variable Schedule shows a scheduled duration on specific days of the week. A Suggested Schedule Time option has been added to the provider system for providers to indicate a suggested time frame for a visit to occur. This option is available only for Daily Variable and Weekly Variable schedule types.
Note: A suggested schedule time is a suggestion and does not affect or limit when a visit takes place.
Across the system, the Suggested Schedule Time option displays where patient schedules or scheduling functions appear such as a patient’s Calendar, visit tabs (Schedule and Visit), patient’s Visits page, and the overall Visit Search page.
The following image shows the suggested times reflected after the duration period. In this example, the 4th has suggested times and the 5th does not.
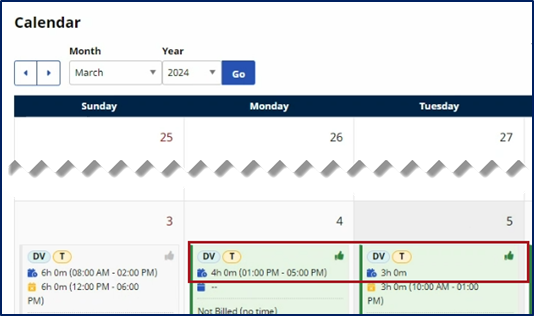
Patient Calendar – Suggested Schedule Times
The Suggested Schedule Time also displays on the patient’s visit Schedule tab, as shown below.
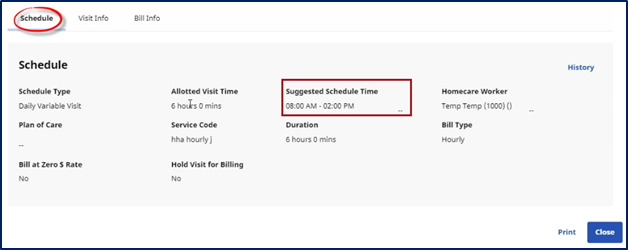
Visit Schedule Tab – Suggested Schedule Time
On the patient’s Visit page, the suggested schedule time displays under the Scheduled column (replacing the duration time) with an icon. Hovering over the icon indicates that the visit has a suggested schedule time (as shown below).
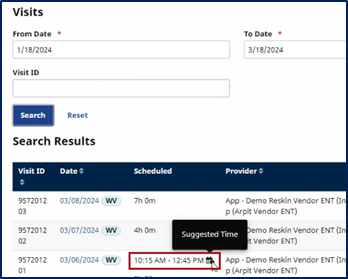
Patient Visit Page – Suggested Schedule Time
Updating Pending Authorizations
The system has been updated to allow Payers to revise authorizations with a Pending status (before a provider accepts or rejects the authorization). To edit an authorization in Pending status, click the ellipsis (…) under the Actions column and select Edit from the menu options (as shown below).

Pending Authorization – Edit Option
Revise and save the authorization as needed. The details update automatically, where the provider can review with the latest details.
Moving Unutilized Authorizations to a New Provider
Payers can now reassign an active authorization that has not been used by the initial assigned provider to another provider. This enhancement facilitates the process of simply moving the authorization rather than having to reject and create another authorization.
Dashboard Custom Views and Added Features
Custom Views
BI Dashboards have been enhanced to enable users to create and save custom views, based on selected filters. With custom views, users can access their saved set of filters to access specific information on dashboards without having to reselect filters each time.
Users can create multiple custom views and set one as default to always open to the selected custom view. The system defaults to Original View to show all details for all dashboards. Click the View tab to toggle between views, as needed.
Create a Custom View
Complete the following steps to create a custom view on any dashboard.
-
Select the desired filters and click Apply.
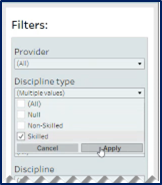
Select Filters
-
Click the View tab at the top bar.

View Original - Tab
-
The Custom Views window opens. Enter a title for the custom view in the Name this view field. To make this a default view, select the Make it my default checkbox and click Save.
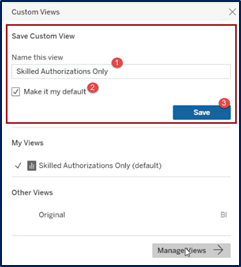
Custom Views Window – Create a Custom View
Once created and made default, the Custom View replaces the Original View on the view tab, as shown below. To toggle between Original and other saved custom views, click on the tab to open the Custom Views window and select other views from the My Views section.

Custom View as Default
Manage a Custom View
Custom views can be edited, renamed, or deleted from the saved views. To manage a custom view:
-
Select the View tab at the top.
-
The Custom Views opens. On the My Views section, select the applicable custom view (if multiple have been created).
-
At the bottom of the window, click the Manage Views button (as shown below).
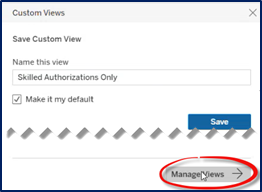
Manage Views Button
-
A set of icons appear under the My Views section of the window (as shown).
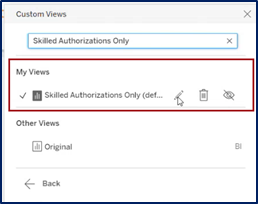
Manage View Options
-
Click the pencil icon to edit or rename the custom view; or
-
Click the trash bin icon to delete custom view. A confirmation window opens when the deleting a custom view. Click Delete as prompted to remove the view.
-
Click Back to return to the dashboard.
Added Functionality
The Download and Full Screen View options have been added to all dashboards.

Added Features
Download
To download dashboard information, click the download icon and select the desired output (such as PDF or PowerPoint).
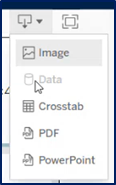
Download Output Options
Follow the system prompts to download the file to your workstation. In the following example, a PowerPoint presentation has been created as an output file with a title page (to include a link back to the dashboard) and an image of the dashboard as the following slide.
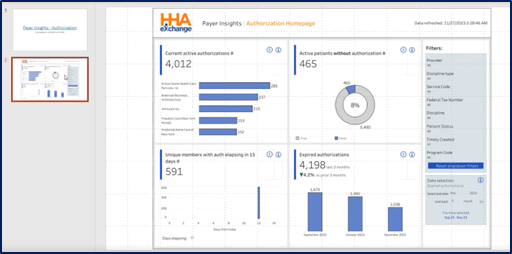
Downloaded PowerPoint
Full Screen
Click the Full Screen icon to expand the dashboard on the screen to full capacity.

Full Screen Option
To exit Full Screen, click the Esc key or click the Full Screen icon to return to standard view.

Return to Standard Screen