Placements
When you offer a Member for Placement, you refer them to a Provider to receive services. A Placement is an offer for service because the Provider decides whether to take the Member’s case.
Placements include an overview of the Member’s service requirements, such as the type of Caregiver as well as the frequency and duration of services. Based on these details, the Provider determines whether to accept or deny the Placement.
Add a New Placement
To offer a Placement, complete the following steps.
|
Step |
Action |
|---|---|
|
1 |
At the top right of the Provider Info page (Member, Search, search for and select a Member, Provider Info), click Add Placement. |
|
2 |
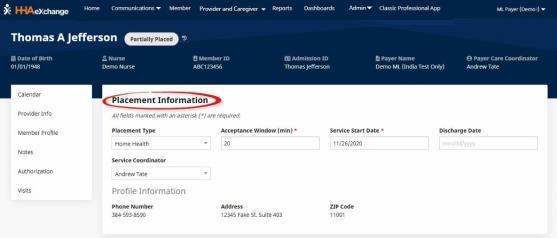
On the Placement Information page, some data is pre-populated with the member’s information. Complete the remaining information in the Placement Information section as follows.
Placement Information section in the Add Placement Window |
|
3 |
In the Authorization section, select an existing Authorization to use—or complete one here with the instructions found in the Authorizations topic. Alternately, select Send Placement without Authorization. |
| 4 |
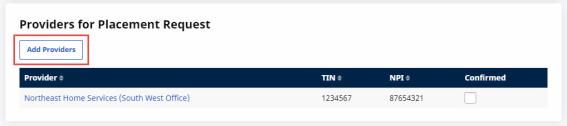
Under Providers for Placement Request, click Add Providers.
Adding a Provider In the dialog box that appears, use the filters to search for a Provider.
Add Providers for Placement Request page Providers can also be selected by Provider Serviced Zip Code. Also, the Member’s ZIP Code can be used to add Providers by selecting the Use member’s ZIP code checkbox (selected by default) to populate Provider Serviced Zip Code with the Member’s ZIP code. |
| 5 |
In the list of Providers that is displayed, select a Provider, and click Add. Note: If you select multiple providers, the first Provider to accept the Placement receives the Member’s case. A multiple provider request is called a Broadcast. When the list of eligible Providers for a Placement Request is 500 Providers or fewer, the ability to “Select and add all” Providers is available. |
| 6 |
(Optional) If a single Provider has agreed to accept the case or is already servicing the member, select the Confirmed checkbox. Once received, the Placement is automatically accepted. |
| 7 |
Click Add Placement to finish adding a Placement. |